

A mobile is the only decoration that is never finished. It turns, settles, catches the light and turns again, rearranging itself with every breath of air the room lets slip.
Making one is a craft of balance more than of decoration: arms, drops and ornaments persuaded, tier by tier, to hang true. This guide builds a real hanging mobile from first sketch to final tuning.

1. How to Make a Mobile at a Glance
A mobile is a balanced hanging construction: ornaments suspended from horizontal arms, the arms suspended in tiers from a single point, the whole so finely poised that air movement keeps it in slow, changing motion. Making one requires no rare skill and few tools — but it does require the maker’s central discipline, balance, applied tier by tier from the bottom up. The subject can be anything light enough to hang: paper birds, shells, shapes of card or metal, found things from the shore. The structure beneath them is always the same, and it is the structure this guide teaches. Mobiles reward makers at every level: a first piece of folded card on dowel arms can hang true within the hour, and the same principles, refined, produce the balanced sculptures that turn for decades in galleries and stairwells.
| Question | Short answer |
|---|---|
| What do I need to start? | Wire or dowel for arms, thread or line for drops, light ornaments and a hook |
| What is the hardest part? | Balance — and it is learned by fingertip, not by calculation |
| Which end do I build first? | The lowest tier; every tier is balanced with all beneath it hanging |
| Where should a mobile hang? | In gentle moving air, clear of heads and doors, fixed into structure |
| Can children make one? | Yes — paper ornaments on dowel arms are a perfect first craft, hung high |

2. What a Mobile Is: Sculpture That Breathes

A mobile is a hanging construction of arms and ornaments balanced so delicately that the room’s own air keeps it in slow motion. It is not a wind chime — it makes no sound and asks for no wind — and it is not a picture: it is the one piece of tiny house wall decor that escaped the wall and took the ceiling instead. Understanding that it is engineered first and decorated second is the whole secret of making one that works.
Movement is the medium
A mobile’s beauty is not in its shapes but in their slow negotiation: tiers turning at different speeds, ornaments passing and repassing like planets in a small, patient solar system. Design the movement first — how fast, how wide, how the pieces meet and part — and choose shapes that serve it.
A mobile is built, not decorated
Every failed mobile fails the same way: pretty ornaments hung on a structure that was never balanced. The craft order is structure, balance, then beauty — and the pleasure of the making is that the structure, honestly solved, turns out to be most of the beauty anyway.
It helps to watch a good mobile before making one: notice how the lowest ornaments move most, how the top tier barely turns, and how the whole piece seems to breathe rather than spin. That layered slowness is not an accident of the piece you are watching — it is what correct balance looks like from across a room, and it is the effect every stage below is quietly aiming at.
3. The Anatomy: Arms, Drops, Ornaments and One Hanging Point

Strip any mobile to its parts and the same four appear: horizontal arms, vertical drops, the ornaments that give the piece its subject, and a single hanging point from which the whole construction breathes. Each part has one job, and most mobile troubles are one part quietly doing another’s.
The arms
Arms are the mobile’s beams — wire, rod, dowel or branch — from which ornaments hang at each end and the tier itself hangs at its middle. An arm must be stiff enough not to bow and light enough not to dominate the tier’s weight.
The drops
Drops are the threads or fine wires between arm and ornament, and between tier and tier. Their lengths choreograph the piece: longer drops slow the movement and separate the layers; shorter ones make a compact, busier mobile.
The ornaments
Ornaments are the visible subject — birds, boats, leaves, shapes, shells — and also the mobile’s weights. Every ornament is ballast with a face: choose it for how it looks and for how much it weighs, because it must do both jobs.
The single hanging point
However wide a mobile spreads, it hangs from one point, and that point is where the whole piece’s balance is finally declared. Everything below it is the mobile’s private physics; everything above it is a hook, a cord and a ceiling that must be trusted.
4. Materials: Wire, Thread, Timber and Found Things
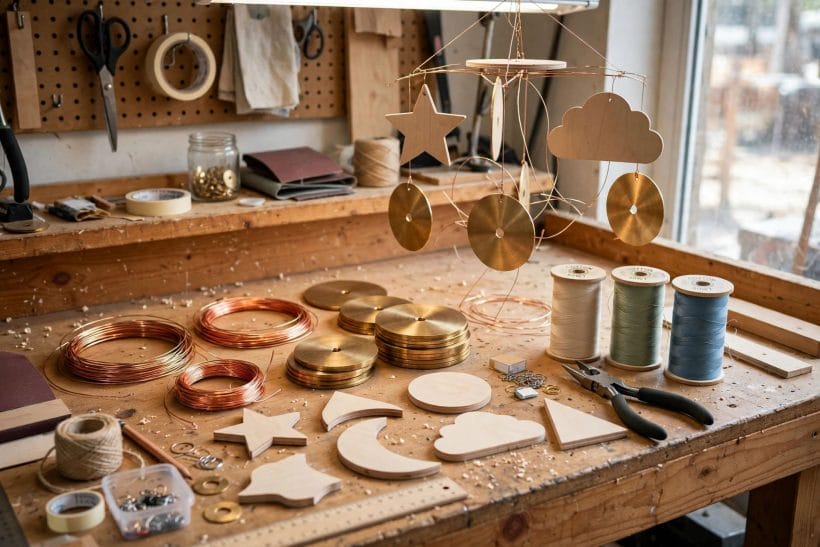
A mobile can be made from a craft shop’s full catalogue or from a drawer and a beach walk. The materials matter less than their marriages: arms stiff enough for their span, thread strong enough for its load, ornaments light enough for their arms.
Wire and rod
Piano wire, brass rod, bamboo skewers and slim dowel are the arm-maker’s staples. Wire arms can be bent to curves and given loops at their ends; rod and dowel stay poker-straight and suit geometric, modern mobiles. Match the arm’s stiffness to the ornaments’ combined weight.
Thread, line and cord
Invisible thread makes ornaments float; fine fishing line is its stronger cousin; waxed linen and silk cord show themselves and suit natural mobiles. Whatever carries weight should be knotted as if the ornament were precious — one day it will be, to somebody.
Ornaments from the house and the shore
Shells, driftwood, seed pods, feathers, offcuts of bark and folded paper from old books: found ornaments carry the mobile’s subject for free and weigh kindly. The gathered approach of tree bark crafts rustic art projects — take what the place offers, work it minimally — is exactly the mobile-maker’s approach too.
The short tool list
Round-nose pliers for loops, cutters for wire, a needle for threading card and shell, clear glue for knots, and a long ruler: the whole craft fits in a biscuit tin. A small drill for piercing ornaments is the only power tool the hobby ever asks for.
5. Balance: The Heart of the Craft

Balance is not a stage of making a mobile; it is the making. A mobile is a tower of balances stacked in the air, each tier a seesaw whose pivot must sit exactly over its load — and the wonderful thing is that hands learn it faster than heads. You do not calculate a mobile into balance. You coax it there. Work at a table with the tier held over a soft surface, expect the first tier to take the longest, and trust that by the third tier your fingers will be finding balance points almost before you ask them to.
Build from the bottom tier up
Always assemble the lowest tier first, balance it, then hang it from the tier above and balance that. Working downward — hanging ornaments onto an already-suspended structure — means re-balancing everything with every addition, which is the road to a drawer of abandoned mobiles.
Finding the balance point
Rest the loaded arm across a fingertip and slide it until the arm lies level and still: that point is where its hanging thread must attach. Mark it before you tie anything. The finger test never lies, and it works on every tier of every mobile ever made.
Equal weight is not equal distance
A heavy ornament close to the pivot balances a light one far from it — the seesaw rule every child knows and every beginner forgets. This is the mobile’s design freedom: arms need not be symmetrical to be balanced, only persuaded.
Adjust in small moves
Near balance, move the thread a hair’s breadth at a time, or slide an ornament a fraction along its drop. Big corrections overshoot; the last stage of balancing a tier is measured in patience, and it is the most satisfying ten minutes of the whole craft.
6. Building, Step by Step

With materials gathered and the balance principle in the hands, the build itself is a calm afternoon’s work. The sequence below is the maker’s standard order — sketch, ornaments, arms, lowest tier, upward, tune — and keeping to it is what separates a finished mobile from a promising tangle.
First, sketch the mobile on paper
Draw the tiers, count the ornaments, decide the subject’s story — a flight of birds, a shoal, falling leaves. The sketch fixes the arm count and the rough sizes before any wire is cut, and it is the plan you will tune against at the end.
Second, make the ornaments
Cut, fold, pierce and finish every ornament before assembly begins. Ornaments made mid-build arrive in different sizes and tempers; a complete set, laid out in rows, lets you pair weights by eye and by hand before a single knot is tied.
Third, cut the arms and prepare the drops
Cut arms a little long — they can be trimmed at the tuning stage, never lengthened. Tie or loop the drops to their ornaments now, at generous lengths, so assembly is a matter of hanging and adjusting rather than knotting overhead.
Fourth, assemble and balance the lowest tier
Hang the lowest tier’s ornaments from its arm, find the balance point with the finger test, and attach its rising thread at the mark. Hang the finished tier from a door handle or a helper’s hand and admire it: this is the mobile’s foundation and its first proof.
Fifth, work upward, tier by tier
Each higher tier carries the balanced tiers below it as one of its loads. Balance each new arm with everything beneath it already hanging — the finger test works the same, only the seesaw is now carrying a family.
Sixth, hang it and tune the whole
Suspend the finished mobile from its final point and watch it for a full minute. One tier kissing another, a drop twisted, a tier turning too eagerly — tune by sliding threads and trimming drops until the whole construction turns like it is thinking.
7. Hanging Points: Ceilings, Beams and Doorways

A mobile is finished twice: once on the worktable and once at its hanging point, because height, light and air decide what the piece becomes. The right point has moving air, room to turn, light that models the ornaments — and a fixing that will hold the piece for years without a thought. Live with the position for a day before making it permanent where you can: a mobile hung in haste often migrates twice before it finds the corner of the room it was always meant for.
The ceiling fixing
A small screw hook into a joist, found by tapping and testing, is the honest fixing; plaster alone holds nothing that matters. Where the ceiling is itself the room’s feature — as in the rooms of tray ceiling living room ideas — hang the mobile in the tray’s field, where its movement draws the eye the ceiling was built to reward.
Beams, shelves and window frames
A beam takes a hook anywhere along its length and suits rustic mobiles; a high shelf edge or a picture rail serves a rental room where ceilings are forbidden. Window frames give the best light and the liveliest air, at the price of the occasional curtain collision — hang clear of the fabric’s swing.
Height and air movement
Hang a mobile where its lowest ornament clears heads, doors and reaching hands, and where the room’s natural air — a doorway’s draught, a stairwell’s rising warmth, the breath of a hall as in the schemes of entry hall ideas — keeps it slowly turning. A mobile in dead air is a mobile asleep.
8. Styles and Themes: Nurseries, Gardens and Grown-Up Rooms

The same craft serves a baby’s first ceiling and a collector’s gallery wall-that-isn’t. Theme is carried by the ornaments; the structure underneath changes hardly at all — which is why a maker who can balance one mobile can make them all.
The nursery mobile
The nursery is the mobile’s ancestral home: shapes drifting above a cot give a baby the world’s first moving picture. The nursery versions planned in tiny house nursery ideas follow the maker’s rules — soft shapes, gentle contrast, nothing heavy — and hang where the safety section below insists they must.
Natural and found-object mobiles
Shells, driftwood, stones with holes, feathers and pods make mobiles that smell faintly of the shore and the wood. They suit garden rooms, porches and bathrooms, and their ornaments are replaced as walks provide better ones — a mobile that evolves with the seasons.
Paper, metal and light-catchers
Folded paper cranes and stars make the lightest, liveliest mobiles of all; beaten metal and glass beads make the ones that catch sun and throw it around the room. Families planning rooms for children, as in tiny house with kids design, often make these the child’s own project — a first mobile is a perfect first craft.
9. Safety, Checks and the Mistakes That Unbalance a Mobile

A mobile is a gentle object with one serious responsibility: it hangs above people’s lives. The checks below are the craft’s conscience — fixings, knots and placement — together with the three mistakes that account for nearly every mobile that ever drooped, tangled or fell. None of them asks for equipment or expertise beyond care, which is exactly why skipping them is the one unforgivable shortcut in an otherwise forgiving craft.
Weight over beds and cots — the firm rules
Nothing heavy hangs over a bed, and nothing at all hangs within a child’s reach of a cot: nursery mobiles live high, fixed soundly, and are retired the moment the baby can pull up. Households that plan family rooms carefully, as in living in a tiny house with kids, apply the same rule to every hanging thing in the house, and so should every mobile-maker.
Knots, loops and fixings
Knot every thread as if the ornament were glass, glue the knots that carry weight, and re-check the ceiling hook each spring. Thread perishes and wire tires; a mobile’s annual inspection takes five minutes and is the difference between heirloom and incident.
The classic mistakes
A top tier too heavy for its cord; arms so long the tiers collide in every draught; ornaments all one weight, forcing a symmetry the maker never wanted. Each mistake is a balance lesson wearing a disguise — unpick, re-balance, and the mobile will teach you its own physics.
10. Costs and Pulling It Together
A handmade mobile’s material cost is famously small — wire, thread and found ornaments amount to pocket money, and even a craft-shop build of brass rod and cut metal stays modest beside any bought piece of comparable size. The real currency is an afternoon and some patience at the balancing stage, which makers tend to remember as the best part of the spend.
Pull the project together in the craft’s own order: choose the subject, make the ornaments as a complete set, build upward from the lowest tier, and hang the finished piece where air and light can do their half of the work.
Final Considerations
There is a reason mobiles have hung in nurseries, studios and sickrooms for a century: they give the eye somewhere kind to go. A room with a mobile in it is never quite still, and never quite the same twice.
Start small — three tiers, one subject, found materials — and let the first balance you strike teach your hands what no instruction can. The second mobile is already designing itself.




0 Comments