

A tiny house after sunset is a different building from the one you planned at noon. Distances shrink, ceilings drop, and a single bare bulb in the middle of the roof — the lighting plan of far too many small homes — flattens every surface, glares into everyone’s eyes, and still leaves the worktop standing in shadow. Good tiny house interior lighting ideas start from the opposite instinct: many small, deliberate sources instead of one bright one, each with a named job, arranged in layers that can be mixed for cooking, working, resting, and finding the bathroom at three in the morning.
Layering is also an economy. Tiny houses often run on modest electrical systems — sometimes a battery bank and an inverter that keep honest accounts — and light spread across efficient fittings, dimmed to exactly the level the moment needs, costs a fraction of one overbright ceiling light burning all evening. This guide builds the system in order: the three layers, a zone-by-zone map of the whole house, the kitchen and bathroom where lighting is a safety issue, the loft where it is a comfort issue, and the switches and night routes that tie it together. Placement matters more than products here, so fittings stay generic — the thinking is the upgrade.
Tiny House Interior Lighting Ideas at a Glance
The table below summarises the ten decisions. Work through them in order — layers first, zones second, controls last — and the house will feel planned rather than lit by accident.
| Idea | Core Move | Why It Works in a Tiny House | Watch Out |
|---|---|---|---|
| 1. Three layers | Ambient, task and accent planned together | Every activity gets its own light | One ceiling bulb does none well |
| 2. Zone map | Decide light per zone before buying | No dark corners, no wasted fittings | Zones overlap in open plans |
| 3. Kitchen task light | Bright, shadow-free worktop light | Safer knives, honest cooking | Your own body blocks ceiling light |
| 4. Dimmers | Variable levels on main circuits | One fitting, many moods and savings | Cheap dimmers can buzz or flicker |
| 5. LED economy | Efficient sources throughout | Kind to batteries and bills | Colour quality varies — test first |
| 6. Daylight layer | Windows planned as lighting | Free, flattering daytime light | Glare and heat at peak hours |
| 7. Bathroom faces | Light from both sides of the mirror | No horror-movie shadows | Steam demands suitable fittings |
| 8. Loft light | Low, warm, reachable from the pillow | Reading comfort, no ceiling glare | Cables and climbing in the dark |
| 9. Night routes | Low-level guidance light | Safe stairs, unbroken sleep | Too bright defeats the purpose |
| 10. Reachable controls | Switches where life happens | Lights actually get used properly | Apps fail; switches do not |

1. Think in Layers: Ambient, Task and Accent
Every well-lit room, however small, runs on three layers doing different jobs. Ambient light is the general wash — the soft overall brightness that lets you move, clean and live without straining; in a tiny house it usually comes from ceiling or high wall fittings with shaded or diffused sources, so the light feels like it comes from everywhere and nowhere. Task light is aimed brightness for work: reading, chopping, sewing, shaving. Accent light is the storyteller — a low glow on a shelf, a warm pool over a picture or plant — contributing almost no useful brightness and almost all of the atmosphere.
The layers matter more at small scale because they share one room. In a big house, a badly lit kitchen is one room’s problem; in a tiny house, the kitchen’s glare is also the bedroom’s and the lounge’s problem. Plan the layers to be separately switchable and separately dimmable, and one open-plan space can be a bright workshop at six and a candlelit den at nine. Ceiling height shapes the ambient layer’s options, so if you are still designing the shell, these tiny house plans with high ceilings show how extra volume gives light room to soften before it reaches you.
2. Map the House Zone by Zone Before Buying Anything
Lighting fails when fittings are bought by bargain rather than by map. Sit in the finished-in-your-head house and walk an ordinary day: where do you chop, read, type, dress, shower, sew, play cards, charge a phone? Each answer earns a line on a simple list — zone, activity, layer, control — and only then do fittings get chosen to serve the list. In an open-plan tiny house the zones overlap physically, so the map’s real job is separating them in light: the kitchen can blaze while the reading corner glows, because their circuits and dimmers never knew they shared a room.
Zones also keep couples and families sane in one shared volume. Independent light for the loft, the desk corner and the kitchen means one person’s early start or late chapter does not flood everyone’s space — these tiny house layouts for couples return to the same principle in floor-plan form. Resist the symmetrical instinct: a tiny house does not need matching fittings in matching places. It needs the right light at the chopping board and the book, and almost none wasted on the ceiling’s centre, where nothing has ever happened.
3. Kitchen Task Lighting: Bright Where Blades and Heat Are
The kitchen is where lighting stops being décor and becomes protective equipment. The classic failure is a single ceiling light behind you: lean over the worktop and your own body shades exactly the board you are cutting on. The fix is light thrown forward onto the work surface — fittings under wall cabinets or shelves, angled or positioned so the worktop is lit and your eyes are not. Add the hob and sink to the same thinking, because steam, hot oil and sharp edges all deserve a clear view, and keep the light’s colour honest enough to judge whether food is cooked.

Keep task fittings wipeable and sensibly placed for a room full of splashes and steam, and put them on their own switch by the worktop rather than at the door — you will use them ten times for every once you use the main light. Overhead, one modest ambient fitting is enough; the drama belongs at the counter. If breakfast happens at a table or bench nearby, give it a pendant or wall light of its own rather than borrowing the worktop light, so the working kitchen can go dark while the eating corner stays warm and sociable.
4. Dimmers: The Hardest-Working Upgrade You Can Fit
If one device transforms tiny-house lighting, it is the dimmer. The same fitting that gives full, shadowless brightness for cleaning at noon can sink to a firefly glow for a film at night, and every level between costs less power than the one above it — dimmed light is literally cheaper light. Dimmers also rescue fittings that turned out too bright, soften the harshness of small rooms where every light is close to your eyes, and let one open-plan space change mood without a single fitting being swapped. Prioritise them on the ambient layer first, then on the loft and living accents.
Honesty corner: not every bulb and dimmer get along. Mismatched pairs can flicker, buzz or refuse to dim below a sullen glow, so test one bulb on one dimmer before fitting out the whole house, and keep a note of the pairing that works. Scandinavian-influenced homes treat dimming as standard rather than luxury — the light-first interiors in these modern Scandinavian tiny house floor plans assume low, warm, adjustable light as the evening default. Fit dimmers where your hand actually falls — beside the sofa, at the loft ladder, by the bed — not only at the door you entered by.
5. LED Economy: Light That Respects a Small Power System
Modern LED sources changed what tiny houses can afford to light. Efficient bulbs and strips sip power compared with older technology, run cool — a genuine comfort in a loft under a summer roof — and last long enough that changing a hard-to-reach fitting stops being an annual ladder event. On a mains connection, the savings are a pleasant discount; on a battery-and-inverter system, they are the difference between lighting designed freely and lighting rationed anxiously. Low-voltage LED strips also open places mains fittings cannot go: under shelves, inside cupboards, along stair edges.
The honest caveat is quality. Cheap LEDs vary wildly in colour: two bulbs claiming the same warmth can render a room green on one side and pink on the other, and poor colour rendering makes food, faces and wood look subtly wrong in ways people feel before they can name. Buy the house’s main bulbs from one batch, choose warm colour temperatures for living spaces, test a single bulb at home before committing — and judge it against your skin and your dinner, not the shop ceiling. Off-grid homes learned this discipline first; these rustic tiny stone cottage floor plans come from a world where every watt is planned like water in a dry season.
6. Daylight Is Your Fourth Layer — Plan Around It
The cheapest, most flattering light in any tiny house arrives through the glass, and a lighting plan that ignores it will fight the sun all day. Read your daylight first: which zones does it reach, where does it glare, and what does it leave in permanent shade? Then place electric light to fill daylight’s gaps rather than duplicate its strengths — a reading chair that is glorious at noon may need a lamp entirely its own by four, and the worktop under a window still needs task light for every evening you will ever cook.
Window design is daylight design. High glass keeps light coming while freeing wall space below and privacy intact, as these clerestory window tiny house layouts demonstrate room after room. Control matters as much as admission: a sheer or blind that tames midday glare without killing the light will save your eyes and your furnishings, and pale walls and ceilings (your paint decisions) multiply whatever daylight you have. At night, the relationship reverses — uncurtained glass becomes a black mirror that swallows light and doubles glare — so a simple curtain or blind is, in the evening, a lighting fitting too.
7. The Bathroom Mirror Problem: Faces Need Light From the Sides
Bathrooms are tiny houses in miniature — small, steamy, and lit, in most homes, by one cruel ceiling fitting directly above the mirror. That arrangement lights the top of your head, shadows your eyes and chin, and makes shaving, make-up and the honest inspection of a tired face a guessing game. The fix used by theatres and good hotels alike is light from both sides of the mirror at face height: two modest sources flanking the glass, or a fitting that spreads light evenly across the face, so features are modelled softly instead of carved by overhead shadow.
Everything in a bathroom must respect the steam. Choose fittings intended for damp zones, keep switches and sockets where local rules and common sense put them, and favour enclosed designs that humidity cannot creep into. A small, warm ambient light earns its place alongside the mirror pair for night visits that should not blast your eyes awake at full brightness. And because the bathroom is where the day starts, its light sets the household’s first mood: warm and face-friendly beats bright and clinical, every single morning, in a room you cannot escape to a bigger version of.
8. Loft Lighting: Low, Warm and Reachable From the Pillow
The sleeping loft breaks ordinary lighting rules because its ceiling is inches from your face and its floor is a ladder away. Overhead fittings glare unbearably at that distance, so loft light belongs low and local: a small shaded lamp or wall light by the pillow, warm in colour, dimmable if possible, and — this is the detail everyone forgets — switchable from the bed itself. Nobody should have to descend a ladder in the dark to turn off a light, or climb into a dark loft feeling for a switch; two-way control between the ladder’s foot and the bed is the correct, unglamorous answer.
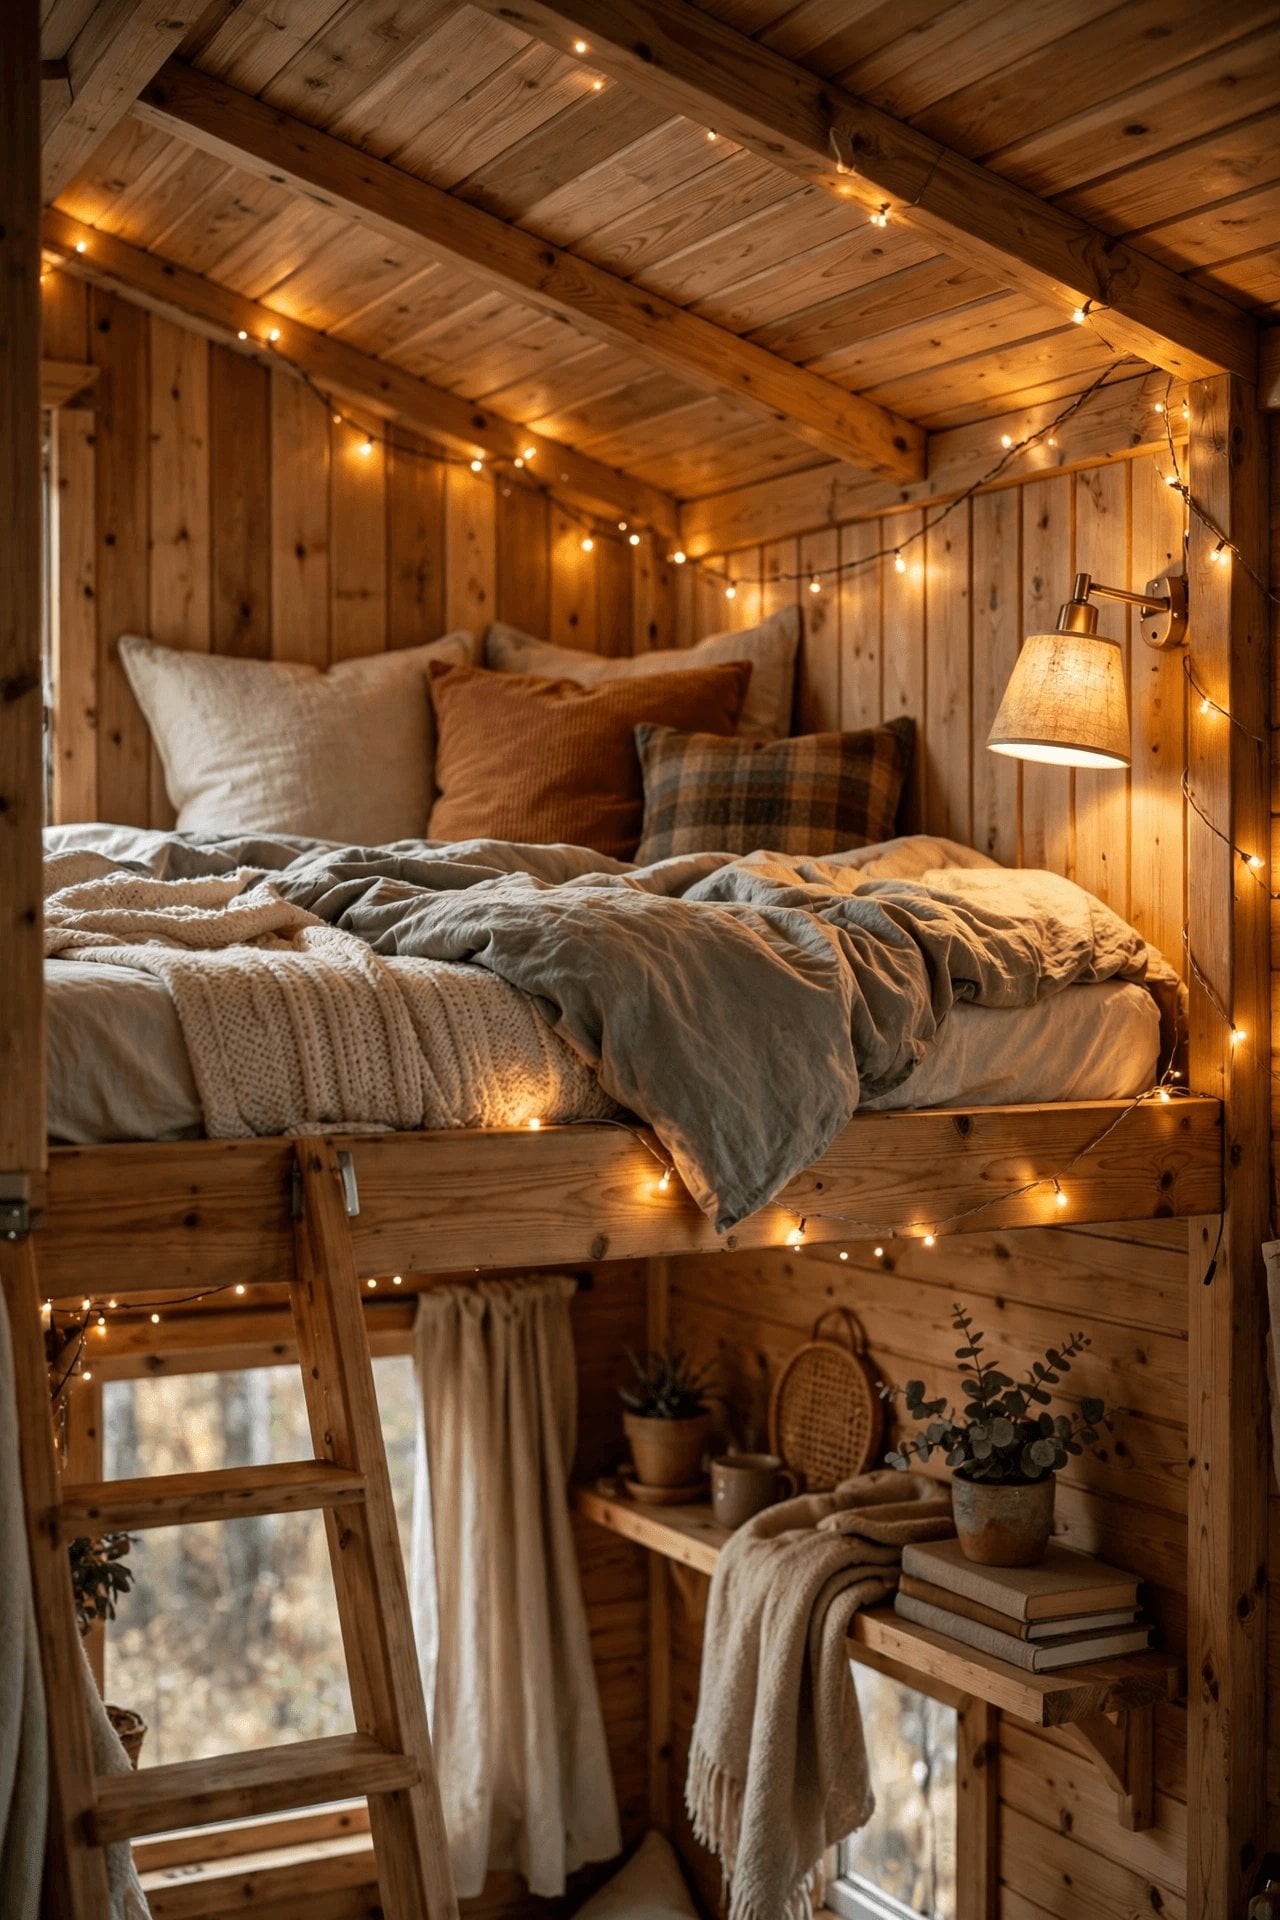
Reading in bed wants a focused, aimable little light that serves one reader without flooding a partner’s side, and morning wants gentleness — a dimmer wound down overnight or a warm, low fitting that will not assault waking eyes. Keep cables captive and fittings clear of bedding, because a loft’s intimacy between fabric, heat and electrics deserves respect. Done well, the loft becomes the best-lit room in the house for its size: a low pool of warm light, a book, and blackout for the window — everything the day’s last hour actually requires, nothing it does not.
9. Stairs, Edges and the Route to the Loo at Night
Every tiny house has a night journey in it — down the loft ladder, across the dark living space, to the bathroom — and lighting it kindly is a safety feature disguised as a luxury. Low-level guidance light solves it: small, warm, downward-aimed sources along the route, at stair treads, the ladder’s base, a skirting line, or just inside the bathroom door, bright enough to read edges and steps by, dim enough to leave sleep intact in the eyes of the traveller and everyone still in bed. Motion-activated versions suit households that trust them; simple switched ones never surprise anyone.
The stairs themselves deserve the same care at all hours: a handrail you can find by touch, step edges that catch a whisper of light, and no glossy tread finishes that turn a lit step into a mirror. Where stairs double as storage — the classic tiny-house arrangement collected in these tiny house plans with hidden storage — a small light inside the stair cupboard or drawer bank ends the torch-in-teeth era for good. Plan the night route before the furniture, walk it in the dark during your first week, and adjust: your body will find every gap your drawings missed.
10. Switches and Controls Where Real Life Actually Happens
A perfect lighting plan fails if its switches live in the wrong places. The rule is to control each light from where it is used and from where the journey starts: kitchen task light at the worktop, loft light from the bed and the ladder, living light from the door and from the sofa — two-way switching wherever a zone has two entrances or two moods. Label nothing, need no manual, and make the default handful of switches by the door the ones a guest can guess: main living light on, everything else discoverable by daylight.
Smart controls can add genuine pleasures — scenes, timers, a single goodnight switch — but in a tiny house they should be a bonus layer over honest switches, never a replacement for them; batteries die, networks sulk, and guests should not need an app to find the bathroom. Flexible spaces argue the same point: rooms that transform daily, like the ones in these convertible furniture tiny house plans, need lighting and controls that adapt with a switch, not a rewire. End with the overnight test: from the bed, in the dark, can you light the way to water, the loo and the door? If yes, the plan is finished.
Final Considerations
Tiny-house lighting succeeds when it disappears into behaviour: bright exactly where hands work, soft exactly where eyes rest, and dark — real dark — where sleep lives. The ten decisions form one system: three layers planned on a zone map, dimmers giving every fitting a range instead of a setting, efficient sources keeping the power budget calm, daylight treated as the senior partner by day, and side-lit mirrors, pillow-reachable loft switches and a gentle night route covering the moments that actually injure or annoy people in badly lit small homes.
Keep the budget of attention honest, too. Spend planning effort on placement, switching and dimming before spending money on beautiful fittings, because a plain fitting in the right place outperforms a lovely one stranded on the wrong wall every night of its life. Live in the house through a few evenings before finalising anything that is expensive to move, mark the changes in pencil on your zone map, and let real dusk correct your drawings. In a tiny house, light is not an accessory added after the design. It is half the architecture — and the half you will feel most, every single evening.


0 Comments