

A freshly mulched front yard reads like a well-made bed: crisp edges, quiet colour under the planting, and not a weed in sight. Mulch is the hardest-working finish in the garden — it dresses the soil, steadies moisture and gives every plant a clean backdrop to be seen against.
These 75 mulch landscaping ideas work through the whole decision: front-yard layouts, colour and contrast, bark and wood mulches, stone and mineral options, living mulches, tree rings, edges, slopes and the seasonal care that keeps it all looking deliberate.

1. Mulch Landscaping Ideas at a Glance
Scope first. This post owns mulch as a front-yard design material — the layouts, colours and care of the mulch layer itself. The wider garden rooms it sits in are covered elsewhere on the site: enclosed green rooms in courtyard landscaping ideas, small-space planting composition in small japanese garden ideas, the street-facing frame in front yard landscaping ideas, compact plots in tiny house garden ideas, pots and raised growing in container garden ideas, and the whole-plot view in tiny house landscaping ideas. Here, everything serves the mulch.
One discipline runs through the list: mulch is a working layer, not a decoration poured on at the end. Depths, materials and edges are stated in general terms throughout — what suits your soil, climate and plants is a local judgement, and the ideas below are starting points to adapt, not prescriptions to copy blind.
| Decision | What to settle | Why it matters |
|---|---|---|
| Layout | Where beds begin and end | Mulch reads as design only inside a clear shape |
| Colour | Dark, mid or pale against planting | Sets the contrast every plant is judged by |
| Material | Bark, wood, stone or living cover | Decides care, texture and how long it lasts |
| Edges | Cut, metal, stone or planted | Keeps the layer in place and the line crisp |
| Care | Top-ups and seasonal tidying | A thin, tired layer fails at every job |

2. Front-Yard Mulch Layouts

Layout comes before material. A mulch layer only looks intentional when the bed it fills has a deliberate shape, a clear relationship to the house and lawn, and enough width to read as a planted room rather than a border apology.
Think of the front yard as three layers working together: the shapes cut into the ground, the planting that fills them, and the mulch surface that ties the two together. When the shapes are strong, almost any honest mulch looks designed; when they are weak, no material can rescue the bed. The nine layouts below cover the shapes that recur in front gardens of every size, from a narrow foundation strip to a full island bed.
1. Sweep one generous curved bed along the facade
A single deep, curving bed against the house gives mulch its best canvas: one continuous surface that unifies foundation planting and lets the curve do the design work from the street.
2. Frame the front door with twin mulched beds
Matching beds either side of the entrance path create symmetry the eye reads instantly. Keep the mulch colour identical on both sides so the pairing reads as one gesture.
3. Run a mulched ribbon under a hedge line
A hedge looks twice as tailored over a clean mulch ribbon. The dark band at the base hides the hedge’s bare ankles and makes the green wall above it look deliberate.
4. Build an island bed in the centre of the lawn
A kidney or teardrop island breaks up a plain lawn and gives a specimen tree or shrub grouping a stage. Mulch the whole island so the planting reads as one composition.
5. Mulch the strip between path and house wall
The narrow foundation strip is where mulch earns its keep daily: it keeps soil splash off the wall, suppresses the weeds that colonise the strip, and tidies the house’s base line.
6. Step beds down a gentle front slope
On a sloping front yard, break the bed into shallow terraces with a planted or stone lip at each step, so the mulch stays where it is laid instead of migrating downhill.
7. Wrap a corner bed around the house edge
Turning the bed around the corner of the house connects front and side gardens into one mulched sweep and removes the awkward grass wedge nobody mows willingly.
8. Pair mulched beds with a gravel forecourt
Where a gravel parking or turning area meets planting, mulched beds soften the hard surface and give the eye a planted edge to rest on before the house.
9. Keep one unmulched breathing space
Design restraint matters: a single strip of lawn, gravel or paving left unmulched between beds stops the front yard reading as one brown blanket and gives each bed definition.
3. Mulch Colours and Contrast

Mulch colour is the garden’s background music — quiet, but it sets the mood for everything planted over it. Choose it against your foliage, your house walls and your light, not from the bag’s photograph.
Colour also ages, and that is part of the choice. Organic mulches mellow as they weather — a rich brown fades towards grey-brown over a season — while mineral mulches hold their tone far longer. Decide whether you want the background to stay constant or to soften gently into the planting, and choose the family that behaves the way you prefer.
10. Choose dark bark to make greens look richer
Deep brown bark mulch is the classic foil: green foliage, silver leaves and pale flowers all gain saturation against it, and the bed reads as fertile even in a dry month.
11. Use near-black mulch for a modern frontage
Very dark mulches sharpen contemporary planting — grasses, phormiums and clipped shapes look graphic against them. In hot, sunny yards, weigh the extra heat the dark surface holds.
12. Pick mid-brown wood chip for a natural woodland read
Mid-toned chips disappear politely under shrubs and trees, suiting informal and cottage frontages where the mulch should serve the planting rather than star beside it.
13. Try reddish bark against grey stone and render
Warm red-brown bark flatters cool grey walls, slate roofs and stone paths, warming a palette that can otherwise feel cold from the street.
14. Use pale straw mulch where light is scarce
In a shaded front yard, a pale straw or light wood mulch lifts the gloom under trees and makes a north-facing bed feel tended rather than neglected.
15. Match mulch tone to the roof or fence for cohesion
Repeating an existing tone — the fence stain, the roof tile, the door colour — in the mulch ties the garden to the house without a single matching plant.
16. Contrast pale stone mulch with dark planting
A light gravel mulch throws dark foliage, bronze grasses and deep-green hedging into relief, and suits dry, sunny frontages where bark would bleach unevenly.
17. Keep one mulch colour across the whole front yard
Whatever tone you choose, hold it constant. A patchwork of mulch colours makes even good planting look accidental; one colour is the cheapest design discipline there is.
4. Bark and Wood Mulches
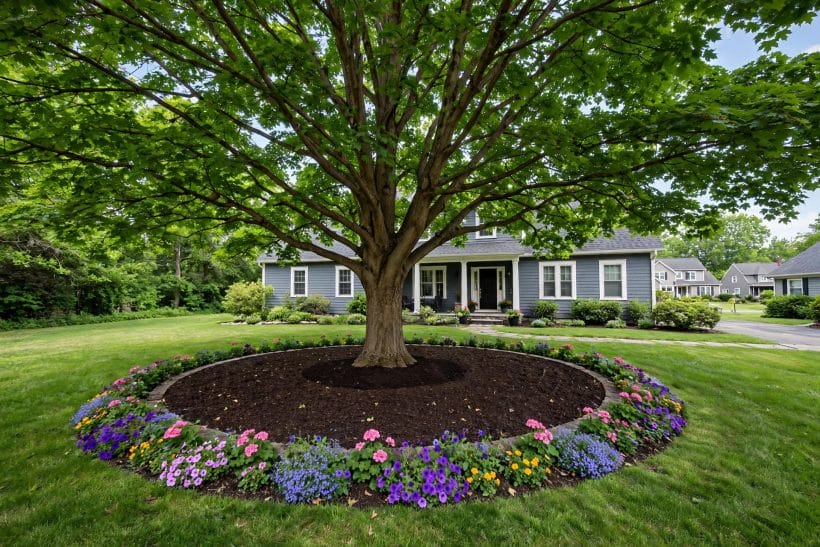
Bark and wood mulches are the default for planted beds: they feed the soil as they fade, sit comfortably under almost any style, and are forgiving to spread. Their differences are in texture, pace of breakdown and how formally they read.
One practical note applies to the whole family: how finely the material is processed decides how it sits. Fine grades knit into a mat and stay put; coarse grades stay open, let air and water through freely, and scatter more easily under birds and weather. Match the grade to the slope and exposure of your bed, not just to the look in the bag.
18. Spread shredded bark for a fine, formal finish
Shredded bark knits into a mat that stays put on gentle slopes and reads neat from the street — the tidy face of the wood-mulch family for front beds.
19. Choose bark nuggets where a chunkier texture suits
Nuggets give a bold, open texture that suits large shrubs and contemporary planting, though they can wander on slopes and are easier for birds to scatter.
20. Use composted bark where soil needs building
Part-composted bark arrives already on its way to humus, feeding soil life as it finishes breaking down — a good choice on thin, tired front-yard soil.
21. Lay wood chip under trees and large shrubs
Arborist-style wood chip is the workhorse under trees: it mimics the woodland floor, moderates soil temperature and breaks down into exactly what tree roots enjoy.
22. Keep fresh chip for paths and utility corners
Very fresh, pale chip reads raw in a show bed; use it on garden paths, behind bins and in working corners where its freshness fades out of sight.
23. Pine bark for acid-loving planting
Where rhododendrons, azaleas, camellias or heathers anchor the bed, a pine-based bark suits the company they keep and the soil conditions they prefer.
24. Cocoa-shell style mulches for small feature beds
Fine, dark, sweet-smelling shell mulches make a handsome finish on small beds near the door; check suitability around dogs before using them, as the shells are not pet-safe.
25. Refresh faded bark with a thin top-dressing
Bark mulch greys as it weathers. A shallow top-up layer restores the colour and the finished look without burying the bed deeper each year.
5. Stone, Gravel and Mineral Mulches

Mineral mulches trade soil-feeding for permanence: they do not rot, blow or fade the way organics do, and they suit dry gardens, modern frontages and spots where a crisp, architectural surface is the point.
Mineral mulches also change how a bed is planted and watered. They warm quickly in spring sun, shed heavy rain off the surface, and suit plants that like a dry crown and free drainage at the neck. Under thirsty, moisture-loving planting they work against the plant’s preferences, which is why the material is best chosen planting-first rather than look-first.
26. Gravel mulch for a dry-garden frontage
Small-grade gravel over free-draining soil suits Mediterranean and drought-tolerant planting, reflecting light up into the foliage and shedding surface water fast.
27. River pebbles for a soft, coastal feel
Rounded pebbles in mixed sizes give a relaxed, beachy surface that pairs with grasses and relaxed planting, and stays put better than angular stone on the flat.
28. Crushed slate for a dark, tailored bed
Slate mulch in plum, blue or charcoal gives a sharp, contemporary finish and a dark ground that flatters silver and white planting schemes.
29. Marble-chip brightness in a shaded corner
Pale marble or quartz chips bounce what little light a shaded bed receives and can lift a gloomy corner beside the house without repainting anything.
30. Lava rock for bold, porous texture
Red or black volcanic rock brings strong texture and colour; use it deliberately in contained feature areas, as its look is assertive and hard to reverse.
31. Stone mulch in the rain-shadow under eaves
The dry strip under the eaves defeats most plants and rots organic mulch unevenly; a mineral mulch handles the drought and the drip line without complaint.
32. Combine stone mulch with a planted matrix
Stone mulch reads best with planting woven through it — low grasses, sedums and bulbs emerging from the gravel — rather than as a bare stone desert.
33. Contain mineral mulches with a firm edge
Stones migrate onto lawns and paths. A fixed edge — metal, stone or brick — is not optional with mineral mulch; it is what keeps the idea tidy.
6. Living and Leaf Mulches

Not every mulch comes in a bag. Living ground covers and the garden’s own leaf fall mulch in place, feeding soil exactly where it lies and softening the whole bed with growth rather than dressing.
Living mulches ask for patience at the start — a season of filling in — and repay it for years afterwards, because a rooted layer does not blow, float or thin the way loose material can. They also ask for honesty about light: a ground cover that sulks in deep shade leaves the soil barer than the loose mulch it replaced.
34. Let low ground cover act as a living mulch
A carpet of low, spreading plants shades the soil, crowds out weeds and keeps the bed green in every season — the mulch is alive, and the bed never has a bare month.
35. Shred the autumn leaf fall back onto the beds
Leaves gathered, shredded and returned as leaf mulch are the woodland cycle at work: free, soil-feeding and perfectly toned to sit under trees and shrubs.
36. Straw mulch in the wilder, productive corners
Straw reads relaxed and rural; it suits front-yard herb and cutting patches, and its pale colour brightens soil while seedlings establish through it.
37. Grass clippings only as a thin, dry layer
Clippings can mulch in a pinch, spread thinly and dry so they do not mat or smell; they suit out-of-sight utility beds better than the show frontage.
38. Pine needles where a light, airy layer suits
Needle mulch stays open and does not compact, knitting loosely over slopes and under conifers; its soft rust tone suits informal and woodland front gardens.
39. Green-manure style cover in a resting bed
A bed being rested or prepared can carry a sown cover that shades the soil all season, then is cut and left in place as the mulch for what follows.
40. Combine living edges with loose mulch hearts
Plant a living fringe at the bed’s edge and keep loose mulch in the centre: the fringe holds the dressing in place and the bed reads green from the street.
41. Seaweed and garden-waste mulches where tradition allows
Coastal and rural gardeners have always mulched with what the place provides, well-composted first; the principle travels even when the material does not.
7. Mulch Around Trees and Shrubs

Trees and shrubs are where mulch does its most valuable quiet work — and where the one famous mistake lives. Keep the layer wide, even and off the trunk, and the planting repays you in growth.
The science of it is unglamorous and settled: roots feed in the top layer of soil, exactly where mulch moderates temperature, holds moisture and adds organic matter as it decays. A tree over mulch is a tree whose feeding zone is being looked after, which is why arborists treat the ring under a tree as part of the tree, not as decoration around it.
42. Spread a wide, flat ring under each young tree
A generous circle of mulch over the root zone holds moisture where a young tree needs it most and keeps mowers and strimmers at a safe distance from the bark.
43. Keep mulch pulled back from every trunk and stem
The rule that outranks all others: mulch against bark holds moisture against the trunk and invites trouble. Leave a clear collar of bare soil around every stem.
44. Never build a mulch volcano
A cone of mulch heaped up the trunk looks landscaped and harms the tree quietly for years. Flat and wide beats tall and neat, every time.
45. Extend the ring as the canopy grows
Roots spread roughly with the canopy. Widening the mulch ring a little each year keeps the feeding zone covered and the lawn retreat graceful.
46. Mulch shrub groups as one shared bed
Shrubs planted in groups thrive under one continuous mulch bed rather than individual rings: the shared layer reads better and the roots share one cool, moist soil.
47. Feed the layer annually under hungry shrubs
Roses and other hungry shrubs consume their mulch; an annual top-up keeps the depth working and the soil biology the shrubs depend on well supplied.
48. Use stone mulch sparingly around young trees
Stone holds summer heat at the surface; around established, sun-loving planting it is fine, but young trees generally do better over a cooler organic layer.
49. Let the mulch edge echo the canopy shape
A scalloped or softly irregular ring edge under a tree looks grown rather than installed, echoing the natural drip line in the front lawn.
8. Edges, Borders and Clean Lines

Ask what separates a mulched bed from a mulched mess and the answer is the edge. The line where mulch meets lawn, path or drive is where the design is judged, every single day.
Edges also decide maintenance. A defined edge gives you a line to work to when you top up, weed or re-cut, and it stops the slow creep by which beds widen and lawns shrink over the years. Choose the edge with the same care as the mulch itself; the two are bought, and judged, together.
50. Cut a clean trench edge along lawn borders
A spade-cut edge with a shallow trench holds loose mulch in, gives the mower a clean line, and costs nothing but an hour twice a year.
51. Set a metal edge for a permanent crisp line
Steel or aluminium edging disappears visually while holding the bed’s shape for years — the professional finish for contemporary frontages.
52. Edge with stone setts where the style is traditional
A single course of stone setts or brick makes a mowing strip and a mulch retainer in one, suiting cottage and period front gardens.
53. Use a planted edge of low, dense growers
A tight fringe of low plants along the border softens the line, holds the mulch back and turns the edge itself into part of the display.
54. Match the edge treatment to the path material
Echoing the path’s stone or brick in the bed edging ties the circulation and the planting into one scheme instead of two competing ones.
55. Sweep the edge line in one confident curve
Wobbly, hesitant curves read as accidents. Lay the hose or rope down, commit to one flowing line, and cut the edge to it in a single pass.
56. Keep mulch a fraction below path level
Mulch finished slightly below the path’s surface stays off the paving in wet weather and keeps walking lines clean through winter.
9. Slopes, Paths and Problem Corners

Every front yard has awkward territory: the slope that sheds its mulch, the shady corner where nothing thrives, the path edges that scatter. Each has a mulch answer, chosen for the problem rather than the catalogue.
The principle behind this section is diagnosis before material. A slope fails by movement, a shady corner by moisture and darkness, a windy bed by lift; each failure has a different fix, and swapping materials without naming the problem just relocates the disappointment. Name the problem first, then pick from the matches below.
57. Shredded bark on slopes, because it knits
On a gradient, shredded and fibrous mulches interlock and stay; nuggets and pebbles travel. Match the texture to the slope before blaming the weather.
58. Terrace a steep bank with planted ledges
Where the slope is serious, low planted ledges or a woven edging at intervals give the mulch a shelf to rest on and the bank a stepped, planted rhythm.
59. Mulch the dry shade under dense trees honestly
Under a thirsty canopy, mulch will not conjure moisture; choose shade-tolerant planting, mulch generously to bank what rain arrives, and accept the woodland character.
60. Use pale mulch to lighten a dark corner bed
A light-toned mulch under a north-facing wall reflects the little light available and stops the corner reading as the garden’s forgotten zone.
61. Keep path-side mulch behind a retaining lip
Along paths, a low lip of stone, brick or timber stops the daily migration of mulch onto the walking line and keeps shoes and hems clean.
62. Mulch the awkward verge between drive and fence
The narrow, shaded verge that defeats lawn and planting alike settles happily under mulch with a few tough ground-cover plants threaded through it.
63. Choose mineral mulch where wind strips organics
On exposed, windy frontages, light bark blows into drifts; a heavier mineral mulch or a knitted shredded layer stays where the design put it.
64. Give the bin store and meter corner a tidy mulch floor
Utility corners look intentional under a simple mulch floor with a stepping-stone path — the cheapest respectability a working corner can get.
65. Mulch around stepping stones for a soft path bed
Stepping stones set through a mulched bed give dry footing, a clear route for the gardener, and a path that never needs mowing or edging.
10. Seasonal Care and Topping Up
Mulch is a consumable finish: it fades, thins and is slowly eaten by the soil it feeds. A light, regular care rhythm keeps every idea above working, without ever re-laying the whole garden at once.
Care is also the moment to notice what the layer is telling you. Mulch that disappears quickly marks hungry, active soil; mulch that sits unchanged for years may be signalling a bed where little is growing or feeding below. Either way, the surface is a report on the soil — read it as you refresh it.
66. Top up thin patches before they show soil
Walk the beds each season and refresh any patch worn thin; small, frequent top-ups keep the depth working and the colour even, and take minutes.
67. Fork over compacted mulch to refresh its face
Organic mulch can crust and mat with age. A light forking breaks the crust, lets water back through and often restores the colour without new material.
68. Weed the stragglers before they seed
Mulch suppresses most weeds, not all. The few that push through are easily pulled from the loose layer — if they are caught before they seed into it.
69. Keep the trunk collars clear at every visit
Topping up creeps inward. Each pass, pull the layer back from trunks, stems and crowns so the clear collar the plants need is never lost.
70. Time the big refresh for spring or autumn
The main annual top-up lands best as beds wake in spring or settle in autumn, when a fresh layer also steadies soil temperature for the season ahead.
71. Rotate a tired corner to a different material
If one corner always looks wrong, change the material rather than adding more of it — stone where bark bleached, bark where stone overheated.
72. Compost the fully spent layer into the soil
When a layer has rotted to crumbs, it is no longer mulch but soil food: fork it in as you top up and the bed gains the humus it has been making.
73. Check depths after heavy rain and re-level
Storms move mulch into drifts and bare patches. A rake pass after heavy weather restores the even layer the design depends on.
74. Sweep paths and drives back into the beds
Scattered mulch on hard surfaces is tidied in minutes with a stiff brush — and returned to the bed, where it belongs, rather than binned.
75. Judge the garden by the beds, not the bags
The finished test is simple: from the street, do the beds read as one calm, deliberate surface under healthy planting? If yes, the mulch is doing all its jobs.
Final Considerations
Mulch rewards the gardener who treats it as a system — layout first, colour with intent, material matched to place, edges kept honest and the layer renewed a little at a time. None of the 75 ideas needs a large budget; most need only the decision to make the soil’s surface as deliberate as the planting above it. Start with the bed you see from the street, hold one colour across the frontage, keep every trunk collar clear, and let the quiet background do its work season after season.




0 Comments