

A wall-mounted screen can free floor space, calm a busy room and give seating a clear focal point. These wall mounted tv ideas put the practical details first — the right height, a secure mount, tidy cables and comfortable viewing — before the panels, shelves, lighting and styling that help a television belong in the room, even when it is switched off.
Work through the sections in order, or jump straight to the part your room needs most: measuring, mounting, wiring, styling or seating.
1. Wall Mounted TV Ideas at a Glance: Height, Mounts and the Basics
A mounted television becomes a permanent focal point, so a few early decisions matter more than all the styling that follows. Settle the screen size, the viewing height and the mount type before you drill anything, and check how daylight falls across the wall at the times you actually watch.
| Decision | What to aim for | Why it matters |
|---|---|---|
| Viewing height | Centre of the screen close to seated eye level | Prevents neck strain and keeps long viewing sessions comfortable |
| Viewing distance | Matched to screen size and room depth | Too close feels overwhelming; too far makes detail and dialogue feel distant |
| Mount type | Fixed, tilting or full-motion, chosen for the room | Controls glare, viewing angles and access to ports behind the screen |
| Wall strength | Fixings into studs, masonry or a reinforced panel | A mount is only as safe as the wall holding it |
| Cable plan | Decided before the screen goes up | Hidden or neatly channelled cables keep the wall calm and safe |
| Sound | Soundbar or speakers near seated ear height | Clear dialogue depends on placement as much as on equipment |
| Light | No window reflections falling directly on the screen | Glare can undo an otherwise perfect layout |

A quick visual summary of mounting height, viewing distance, mount types and cable planning before you start.
- Centre the screen at seated eye level. Sit where you normally watch, mark your natural eye line on the wall, and aim the centre of the screen close to it. This single measurement prevents most uncomfortable installations.
- Measure from the floor, not the ceiling. Ceiling heights vary and floors are where the seating sits, so work upwards from the sofa. A tape measure and a patient partner make this stage quick and accurate.
- Tape the outline first. Mark the screen’s full outline on the wall with low-tack tape and live with it for a day. Clashes with doors, shelves, radiators and artwork become obvious immediately.
- Choose the mount for the room. Fixed mounts suit a single seating row facing the wall; tilting mounts help above fireplaces; full-motion arms serve corner seating and rooms where the screen must turn.
- Check the wall before you buy. Stud walls, solid masonry and plasterboard all need different fixings. Knowing the construction first avoids buying a bracket you cannot install safely.
- Plan port access. If consoles and players connect and disconnect regularly, choose a mount that pulls forward or tilts enough to reach the back panel without taking the screen down.
- Decide the cable route early. In-wall kits, surface trunking and a media unit below the screen all work well, but each needs planning before the bracket goes on, not after.
2. Mounting Heights and Viewing Angles That Stay Comfortable
Height is the decision viewers feel in their necks every single day, so it deserves more care than any other. These checks work for family living rooms, media corners and the compact layouts in our Tiny House Living Room Ideas guide alike.

- Match the height to your main seat. The best position serves the seat used most. A low lounge sofa needs a lower centre line than upright chairs used only for occasional viewing.
- Tilt down when mounting high. Above a fireplace or in a higher position, a tilting bracket angles the screen gently towards viewers and restores a comfortable, natural viewing line.
- Keep a level reference line. A spirit-level line across the bracket fixings keeps the screen true. Even a slight tilt becomes distracting once straight shelves and door frames surround it.
- Test with a cardboard template. A lightweight template cut to the screen’s size lets two people hold, raise and lower the position until everyone agrees, long before any drilling.
- Mind the fireplace combination. Above a fireplace, consider heat and viewing angle together. If the fire is used often or the height strains your neck, another wall is kinder.
- Use a full-motion arm for corners. Corner mounting with an articulated arm lets the screen sit flat for a tidy look and swing out square to the seating at viewing time.
- Leave breathing room around the panel. A small gap between screen and wall helps ventilation and makes lifting the set on and off its bracket far less awkward.
- Seat every viewer before drilling. Have each regular viewer sit in their usual place while the template is up. Comfort is personal, and this simple test settles arguments with evidence.
3. Brackets, Fixings and Wall Types
The bracket is the quiet engineering behind every successful installation, and the right choice depends on your wall as much as your screen. Film fans planning a dedicated viewing corner will also enjoy the setups in our Tiny House Home Theater guide.

- Fixed mount for a clean, flat finish. The simplest bracket holds the screen close to the wall like a picture frame, suiting rooms where seating faces the wall squarely and glare is minimal.
- Tilting mount for glare control. A gentle downward tilt improves the viewing angle from low seats and can deflect reflections from windows and ceiling lights above the screen.
- Full-motion mount for flexible rooms. Swing, extend and swivel functions serve open-plan spaces where the screen faces a sofa in the evening and a kitchen or desk during the day.
- Anchor into studs on framed walls. On stud walls, fixings should land in the timber frame rather than only the board. A stud finder and careful marking are essential parts of the job.
- Use proper masonry fixings on brick. Solid walls are strong but need the right plugs and bolts for the load. Follow the mount maker’s guidance for the exact material you have.
- Reinforce plasterboard-only positions. Where no stud falls behind the chosen spot, specialist anchors or a plywood panel spread the load safely across a wider area of wall.
- Respect the size and weight rating. Match the bracket to the screen’s mounting pattern, size and weight, and choose a rating with headroom. It is cheap insurance for an expensive panel.
- Keep tools and fixings organised. Lay out every bolt, spacer and washer before lifting the screen. Calm, methodical fixing makes the final lift-and-locate step quick and safe.
4. Cable Management That Disappears
Nothing spoils a floating screen faster than a tangle of leads dropping to the nearest socket. Plan the route while the wall is still bare, keep power and signal tidy, and the whole installation will look calm from every seat in the room.

- In-wall cable kits for the cleanest look. A purpose-made in-wall kit passes signal and power behind the surface for a fully floating effect. Check local rules and use products designed for the job.
- Paintable surface trunking. A slim channel running from the screen down to the socket can be painted to match the wall, giving a tidy finish without opening the wall up.
- Let the media unit hide everything. A low console directly below the screen swallows cables, players and routers, and gives remotes and a soundbar a natural, reachable home.
- Bundle leads with soft ties. Group power and signal cables with reusable fabric ties rather than tight plastic ones, which can kink leads and make future changes frustrating.
- Leave a small service loop. A little slack behind the screen lets you pull it forward to change a lead without unmounting everything or straining the connectors.
- Label both ends of every lead. Small labels save real time when a console changes or a soundbar arrives. Future you will be grateful for this five-minute habit.
- Route away from heat sources. Keep cables clear of radiators, fireplace surrounds and strong sun patches, all of which can age insulation and connectors over time.
- Add protection you can reach. Surge protection housed in the media unit guards the whole setup, and an accessible switch makes full shutdown easy when storms threaten.
5. Panels, Slats and Backdrops Behind the Screen
The wall behind the screen decides whether a mounted television looks like an afterthought or the room’s designed centrepiece. Texture, colour and joinery all help, and our Tiny House Interior Paint Colors guide is a useful companion when choosing backdrop tones.

- Timber slat feature wall. Vertical slats add warmth and rhythm behind a screen and can conceal a cable channel within their depth. Keep the finish matte to avoid reflections.
- Painted panel in a deeper tone. A rectangle of deeper colour behind the television frames it like artwork and softens the contrast between a black screen and a pale wall.
- Limewash or plaster-effect finish. A soft, cloudy texture gives a plain mounting wall quiet character without introducing pattern that would compete with the picture during viewing.
- Upholstered panels for softness. Fabric-wrapped boards soften sound in echoey rooms and make a media wall feel like furniture rather than technology on display.
- Stone or brick backdrop. A masonry backdrop suits rustic and industrial rooms and pairs naturally with a fireplace wall, as long as the fixings suit the material.
- Built-in shelving around the screen. Joinery framing the television with shelves and cupboards turns a blank wall into the room’s storage centre, hiding equipment in closed sections.
- Picture-frame moulding detail. Simple applied mouldings painted to match the wall add classic structure around the screen in traditional rooms, with no heavy building work.
- Two-tone wall split. Paint the lower wall a grounding colour and keep the upper part pale. The screen sits within one calm band and the room feels taller.
6. Lighting and Sound for Mounted Screens
A great picture deserves comfortable light and clear sound. Small changes — a shaded lamp moved a metre, a rug under the coffee table, a soundbar centred properly — often improve film nights more than new equipment would.

- Bias lighting behind the panel. A soft glow behind the screen eases the contrast between a bright picture and a dark room, making evening viewing noticeably more comfortable.
- Curtains or blinds for daytime glare. If windows face the screen, lined curtains or adjustable blinds are the simplest cure. Test the light at the hours you actually watch.
- Side lamps instead of ceiling glare. Low, shaded lamps beside the seating add warmth without reflecting in the screen the way bright downlights so often do.
- Soundbar centred under the screen. A soundbar aligned with the screen’s centre keeps dialogue anchored to the picture, whether it sits on the console or mounts below the set.
- Speakers near ear height. Where separate speakers are used, aim for placement near seated ear height and roughly symmetrical, so sound feels balanced from every seat.
- Rugs and soft furnishings for echo. Hard media walls can sound harsh. A rug, cushions and curtains absorb reflections and make speech clearer at normal volumes.
- Dimmer control for film nights. Dimmable lighting lets one room serve bright family evenings and low-light film sessions without changing a single fitting.
- Hide the subwoofer thoughtfully. Low bass travels well, so a subwoofer can live beside the console or in a corner — out of sight, but not sealed inside a closed cupboard.
7. Seating Layouts Around a Mounted TV
Once the screen is fixed, the seating must meet it halfway. Arrange the most-used seats first, keep walkways clear, and borrow the flexible thinking found in our Modern Tiny House Interior Ideas for rooms that serve more than one purpose.
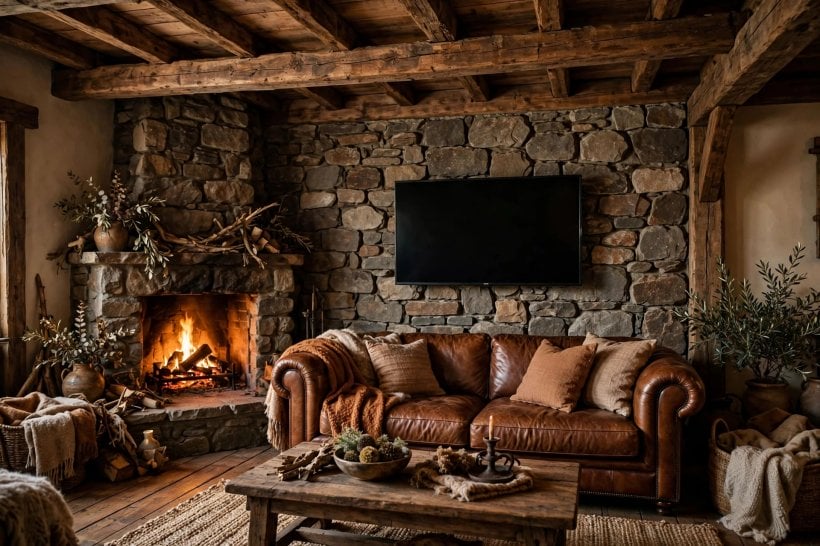
- Face the main sofa squarely. The most-used seat deserves the straight-on view. Angle secondary chairs towards the screen rather than compromising the primary position.
- Keep a clear walkway. Leave a comfortable path past the seating so nobody crosses the picture during viewing, and the room still works well when the TV is off.
- Swivel chairs for flexible corners. A pair of swivel chairs can face the conversation area most of the day and turn to the screen in seconds when a film starts.
- Add a chaise or daybed for lounging. In family rooms, one lounger seat lets someone stretch out fully without the whole sofa being given over to reclining.
- Use a rug to define the viewing zone. A rug under the seating group quietly marks the viewing territory in an open-plan room and softens sound at the same time.
- Keep side tables within reach. Drinks, remotes and glasses need homes at arm’s height beside the seats, so walkways stay clear and the console stays uncluttered.
- Try a low-back sofa under higher mounts. Where the screen sits higher, a low-backed sofa keeps sightlines open and stops the seating from visually crowding the wall.
- Leave the doorway view calm. If the screen is visible from the hall, consider art modes and tidy cables so the first impression of the room stays composed.
8. Small Rooms, Apartments and Tiny Homes
Mounting is the small room’s best friend: it removes the stand, frees the floor and lets a modest screen feel generous. The same every-centimetre discipline runs through our Tiny House Bedroom Ideas, where each piece has to earn its place.

- Choose the screen for the distance. In compact rooms, a moderate screen mounted flat often feels larger and calmer than an oversized panel dominating every sightline.
- Float the console off the floor. A wall-hung unit below the screen keeps the floor visible, which makes small rooms feel larger and cleaning underneath effortless.
- Use the mount to replace a stand. Mounting removes the need for a deep television stand entirely, freeing valuable floor area for seating or storage in tight layouts.
- Corner-mount to save a wall. In studios, mounting in a corner preserves the only full wall for a sofa or bed while still giving a comfortable angled view.
- Combine with fold-down seating. Wall-mounted screens pair well with folding or stackable chairs that appear for guests and vanish when the room must work another way.
- Keep accessories in closed storage. Small rooms show clutter quickly. Closed baskets and cupboards keep remotes, chargers and consoles out of sight but within easy reach.
- Think in zones, not furniture. Define a viewing zone, a reading corner and a work spot with rugs and lighting rather than more pieces competing for the same floor.
9. Styling the Wall Around the Screen
Styling is what makes a mounted screen feel designed rather than installed. The principles mirror those in our Tiny House Interior Design guide: balance, repetition and a few confident choices instead of many small ones.

- Gallery wall that includes the screen. Treat the television as the largest frame in a gallery of prints and photographs, held together by common spacing and frame tones.
- Symmetrical shelves for calm. Matching shelves or cabinets on both sides settle the composition and give books and objects a disciplined, restful order.
- Plants to soften the edges. Trailing or upright plants near the console soften the rectangle’s hard lines and bring life to a technology-heavy wall.
- Art or frame mode when idle. Many modern sets display artwork when off. Choose calm images that suit the room’s palette rather than bright, busy scenes.
- Repeat the screen’s black sparingly. A few dark accents — a picture frame, a lamp base, a side table — echo the screen so it feels intentional rather than accidental.
- Style the console in odd numbers. Groups of three or five objects, varied in height, look collected rather than staged on the surface below the screen.
- Keep remotes beautiful or hidden. A small tray, box or drawer for remotes keeps the styling intact and ends the daily hunt for the controller.
10. Safety, Maintenance and Future-Proofing
A mounted screen should stay safe, clean and easy to live with for years. A few habits protect the equipment, the wall and everyone who uses the room, and make the next upgrade a simple swap rather than a rebuild.
- Child- and pet-proof the setup. Mounting keeps screens out of reach of small hands and paws, but check that cables cannot be pulled and consoles cannot be climbed.
- Recheck fixings after the first weeks. Once the household has used tilts and swivels for a while, confirm every bolt remains snug and the bracket still moves as it should.
- Clean the screen gently. A dry or barely damp microfibre cloth protects modern screen coatings. Harsh sprays and rough cloths can mark a panel permanently.
- Ventilate players and consoles. Equipment in closed cupboards needs airflow. Vent slots, mesh panels or a small gap at the back stop heat building up during long sessions.
- Leave room to upgrade. A mount and cable route planned with spare capacity make the next screen, console or soundbar a simple swap rather than a fresh project.
- Photograph the wall before covering it. Before panels or trunking hide the fixings, take clear photos showing studs, cables and brackets. They are gold when you next drill that wall.
Final Considerations
The most successful mounted-TV rooms are planned in a calm order: measure the seating, choose the height, confirm the wall, then mount, wire and style. Comfort and safety always outrank decoration, because the styling can evolve easily while the fixings should only ever be done once.
Always follow the mount manufacturer’s instructions for your wall type, and use a qualified electrician for any new in-wall power work. With those foundations right, a wall-mounted screen gives the living room a clear focal point, more floor space and a finish that feels considered from every seat.


0 Comments