

The most dangerous tool in a first build is ambition. Compound angles, custom trusses and clever cantilevers are where beginner projects go to stall — usually under a tarp, halfway through the rainy season. The plan that gets finished is not the most beautiful one; it is the most buildable one: rectangles, standard lumber, and a roof a beginner can actually frame.
DIY-Friendly Tiny House Plans: At a Glance
Every plan in this collection shares the same DNA: a rectangular footprint, standard lumber dimensions, a simple gable or shed roof, no compound angles, and a framing sequence a beginner can follow without a mentor on speed dial. These diy-friendly tiny house plans are designed for someone whose most advanced tool is a circular saw and whose most advanced skill is patience — and they still end at a real, weathertight house. What varies is where each plan spends its simplicity: one shrinks the framing package to under 100 pieces, another orders the roof as pre-built trusses, another pre-cuts and numbers every board before assembly day. Read the table first, because the right plan is the one whose simplifications match the skills you already have.
| Plan | Footprint / Method | Signature Number | Best For |
|---|---|---|---|
| 1. The 8×20 Rectangle | 8×20 on skids or piers | Under 100 pieces of lumber | The absolute simplest first build |
| 2. The Gable Box | 8×24, ordered trusses | Roof framed in a day | Beginners who fear rafter math |
| 3. The Platform Deck | Floor-first build sequence | Deck as the measuring reference | Builders who want a foolproof order of work |
| 4. The Shed Roof Studio | 8×20, single slope | Zero valleys, zero hips, zero ridge | The most forgiving roof of all |
| 5. The Post-and-Beam Hybrid | Posts on 8-foot centers | 12 big posts instead of 100 studs | Fewer, bigger, more forgiving pieces |
| 6. The Pre-Cut Kit Plan | 10×16 kit cabin | 87 numbered pieces | Assembly as sequencing, not measuring |
| 7. The Straight-Wall Interior | 8×24, three rectangles | Every door a standard pre-hung unit | Interiors with no angle cuts |
| 8. The Single Wet Wall | One 12-foot plumbing wall | Plumbing complexity drops 80% | First-time plumbers using PEX |
| 9. The Electrical Simplicity Plan | Surface-mount conduit, one panel | One 100-amp panel, 8–10 circuits | Wiring you can inspect and correct |
| 10. The Two-Weekend Shell | 8×16, platform method | Weathertight shell in two weekends | Motivation through a fast shell |

The numbers that keep a first build simple: under 100 framing pieces, 87 numbered kit parts, 80% less plumbing complexity, a shell standing in 14 days, and a tool kit under $800.
Underneath the ten plans sits one checklist, and it is worth memorising before you fall in love with any single layout. Keep the footprint a rectangle, sized in 2-foot increments so plywood sheets land whole. Frame walls in 2×4 or 2×6 at 16 inches on center, with pre-cut studs — 92-5/8 inches for 8-foot walls. Choose a shed or gable roof, and order the trusses rather than cutting them. Span nothing over 12 feet without an LVL and a second opinion. Put plumbing on one wet wall with a PEX manifold, run electrical as surface conduit or simple home runs to one panel, and make every cut 90 degrees — no compound miters anywhere. The tool kit that builds all of it is equally short: circular saw, drill/driver, a miter saw (borrowed is fine), a 4-foot level, framing square, chalk line, tape measure, a rented nail gun, and ladders — under $800 to buy, under $200 to rent. If a plan needs a tool that is not on that list, it is not a beginner plan.
1. The 8×20 Rectangle: The Starter Build With Under 100 Pieces of Lumber
This is the simplest possible tiny house, and it knows it. An 8×20 rectangle on skids or piers, 2×4 walls at 16 inches on center, a single-slope shed roof, one door and six windows. Every cut is 90 degrees, every span is standard, and the entire framing package comes in under 100 pieces of lumber. A first-timer can frame it in two weekends with a borrowed nail gun. The interior is one open room — finish it however you like — because the achievement of this plan is not the layout. The achievement is the weathertight shell, standing, square and dry.

The discipline that makes the rectangle work is the lumber list. Design to standard lengths — 8, 10 and 12 feet — so every board is used whole, and waste stays under 5%, the mark of a well-designed beginner plan. That single rule quietly eliminates the two things that sink first builds: the mid-project lumber run that eats a Saturday, and the creeping pile of offcuts that represents money converted into firewood. Among all the tiny house floor plans a beginner might choose, this is the one where the shopping list, the cut list and the build are all the same short document.
2. The Gable Box: An 8×24 Whose Roof Arrives as Ordered Trusses
The gable box is the step up for builders who want a classic roofline without the classic roof mathematics. The 8×24 box uses 2×6 walls — chosen for better insulation — and a 4/12 pitch that is walkable and shingle-friendly. The roof itself is the trick: site-built or ordered trusses arrive pre-engineered, set on 24-inch centers, and the roof is framed in a day. No ridge beam math, no rafter cuts, no compound angles perched on a ladder with a speed square and a prayer.

Ordering trusses is, plainly, the single best beginner decision in this entire list, because it deletes the roof’s complexity instead of asking the builder to survive it. The truss plant’s engineer carries the load calculations; the builder carries the trusses. Contrast that with the roof geometry in our roundup of a-frame tiny house floor plans, where the roof is also the wall and every angle is structural — beautiful, and exactly what a first build should postpone. The gable box keeps the romance of a pitched roof and outsources everything frightening about it.
3. The Platform Deck: The Floor-First Method That Sequences the Whole Build
Some plans simplify the parts; this one simplifies the order. The platform deck method builds the floor deck complete first — joists, subfloor, squared and level — then frames the walls flat on that deck and tilts them up, then sets trusses or rafters on top. Every beginner plan should be a platform plan, because the sequence itself prevents the classic errors: walls are assembled lying down, where measuring is easy and mistakes are cheap, and they rise onto a surface that is already known to be flat and square.

The deck’s second job is just as important: it is the measuring reference for everything above it. Wall lengths are checked against the deck’s edges, diagonals are pulled across the subfloor, and any error announces itself while it is still a pencil line instead of a leaning wall. Balloon framing and the other advanced techniques have no place in a first build precisely because they remove this reference — they ask the builder to hold dimensions in the air. The platform method keeps every dimension on the floor, under your boots, where a beginner can see it, snap a chalk line across it, and trust it.
4. The Shed Roof Studio: A Single Slope With Zero Valleys
A single-slope shed roof has zero valleys, zero hips and zero ridge: just rafters spanning from the high wall to the low wall, every one cut identically. The 8×20 shed studio runs a 3/12 slope — the shingle-safe minimum — with 2×8 rafters at 16 inches on center and a simple fascia. Roofing is one rectangle of shingles or metal, with no junctions where leaks are born. It is the most forgiving roof a beginner can build, and forgiveness is the entire specification.

The tall wall that makes the slope possible is equally undemanding: it is just longer studs, framed exactly like the low wall, with no special techniques hiding anywhere. That is the point worth internalising — on a beginner plan, every unfamiliar detail should turn out, on inspection, to be a familiar detail in a slightly larger size. Builders weighing whether they can genuinely build their own tiny house should study this plan closely, because its answer is the honest one: yes, if the roof is one slope, the rafters are all twins, and nothing on the drawings requires a cut you have never made before.
5. The Post-and-Beam Hybrid: 12 Big Posts Instead of 100 Small Studs
The hybrid inverts the starter rectangle’s arithmetic. Instead of a hundred small studs, it uses 12 big posts: a post-and-beam frame on 8-foot centers, with structural insulated panels (SIPs) or board-and-batten infill between the posts. Fewer pieces means fewer connections and fewer cuts, and the heavy timber frame is forgiving of small errors in a way stick framing never is — a 1/4-inch gap in a post joint is shimmed and forgotten, while a 1/4-inch error in stick framing compounds quietly down the wall.

The result looks like a barn and builds like furniture, which is a useful combination for a beginner whose confidence needs feeding. Each connection is large, visible and understandable; nothing depends on a hidden nailing pattern or a tolerance you cannot see. The trade is honest, too: the pieces are heavier, and setting posts is a two-person job with proper bracing while the frame is incomplete. But for builders who think in furniture rather than in framing — who would rather fit twelve honest joints than a hundred invisible ones — the hybrid converts the build’s hardest demand, precision, into its most forgiving material, mass.
6. The Pre-Cut Kit Plan: 87 Numbered Pieces, Assembly as Sequencing
The kit plan attacks the most common beginner error at its root: measuring wrong under time pressure. Every piece is dimensioned, numbered and cut from a cut list before assembly begins. The 10×16 kit cabin uses 87 numbered pieces, and once they exist, assembly is sequencing, not measuring — you find the number, you place the piece, you fasten it. Pre-cutting takes a weekend with a miter saw and a helper, and it moves every measuring mistake to the one phase of the build where mistakes are calm, correctable and made at a workbench instead of on a ladder.
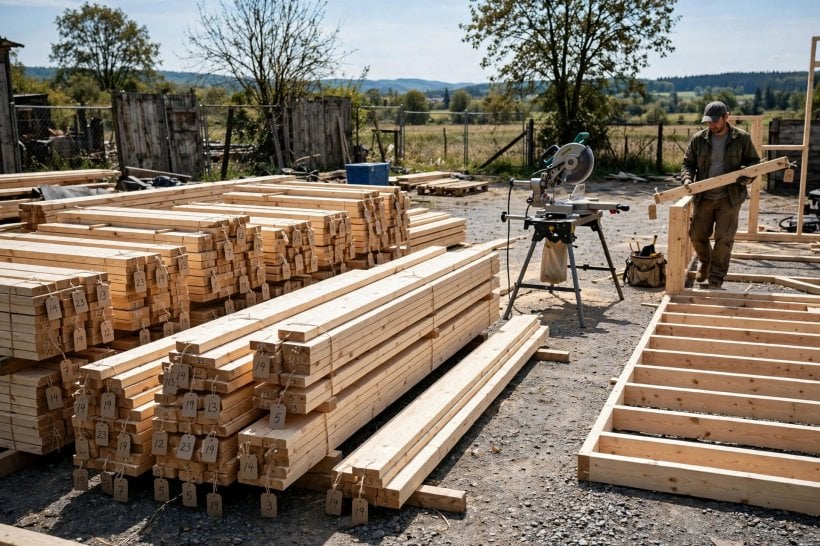
What the kit really sells is a change in the emotional texture of the build. A conventional first build alternates between measuring anxiety and cutting regret; a kit build feels like assembling furniture, in long satisfying runs where the structure visibly grows. It is also the plan that pairs best with the way beginners actually schedule their lives — the cutting weekend and the assembly weekend are separate, self-contained projects, and a rainy assembly weekend simply swaps back to cutting. If you are comparing this approach with factory-built sections, the phased logic in our modular tiny house floor plans is the same idea at a larger scale: pieces prepared somewhere controlled, joined somewhere simple.
7. The Straight-Wall Interior: Three Rectangles and Not One Angle Cut
Exterior simplicity can be wasted by an interior full of clever angles, so this plan keeps every interior wall straight and parallel: no angled walls, no curved partitions, no 45-degree corners. The 8×24 interior divides into three rectangles — bedroom, bath, living-kitchen — separated by straight 2×4 partitions. Every drywall sheet fits without angle cuts, every door is a standard pre-hung unit, and every trim piece is a straight cut. Boring is buildable, and boring, finished well, is also calm to live in.

The dividend compounds at every later stage. Rectangular rooms take standard flooring without diagonal waste, standard cabinets without filler gymnastics, and furniture that actually fits against walls. And when the second build comes — the ambitious one — the straight-wall house stands as proof of how much of a home’s quality is proportion and finish rather than geometry. Beginners comparing layouts in the tiny house blueprints explorer will notice that the plans which photograph as “simple” and the plans which build as simple are usually the same plans, and this interior is the reason why.
8. The Single Wet Wall: Every Fixture Backing Onto One 12-Foot Wall
Plumbing frightens beginners out of proportion to its actual difficulty, and this plan removes the proportion problem by removing the geography. Every fixture — kitchen sink, bath vanity, shower and toilet — backs onto a single 12-foot wet wall. There is one wall to drill, one wall to insulate around pipes, and one straight run of supply and drain. The beginner plumber runs one manifold and four short branches, and plumbing complexity drops by 80% versus fixtures scattered across four walls.

The material choice finishes the simplification: PEX, worked with push-fit or crimp fittings, lets a first-timer plumb a whole tiny house in a weekend — one manifold, color-coded lines, no soldering, no torches, no flux on a ladder. Short branches mean short waits for hot water and few joints, and few joints mean few places a leak can ever start. If one wall of the house deserves to be designed first and most carefully, it is this one, because concentrating the water also concentrates the risk where you can see it, reach it and shut it off.
9. The Electrical Simplicity Plan: Surface-Mount Conduit and One 100-Amp Panel
The electrical plan applies the same visibility doctrine to wiring. Instead of fishing wire through drilled studs — hidden, committed, and miserable to correct — the circuits run as surface-mount conduit, EMT or Wiremold, visibly along the walls in an industrial aesthetic that tiny houses wear well. Every box is accessible, every run can be traced by eye, and mistakes are correctable without opening a wall. One 100-amp panel feeds 8–10 circuits, all home runs visible from box to breaker.
The deepest beneficiary is not the builder but the inspection — and the builder’s sleep. The electrical inspector can see everything; so can the person who wired it, at any later date, when a circuit needs extending or a fault needs finding. Hidden work asks to be trusted; visible work can be checked. For a first-timer, that distinction is the difference between an electrical system they understand and one they merely hope about, and hope is not a wiring method.
10. The Two-Weekend Shell: A Standing, Roofed Structure in 14 Days
The finale is a psychological plan disguised as a floor plan. The 8×16 shell is designed so its weathertight envelope — foundation, floor, walls, roof, windows, doors — is achievable in two weekends by two beginners, using the platform method, pre-built trusses and a shed or gable roof. The interior finish then happens over the following months, at leisure, inside a house that already exists. Nothing about the plan is technically exotic; its genius is motivational. A standing, roofed structure in 14 days keeps a builder going through the slower finish phase in a way no pile of lumber ever has.
That motivation is a real construction resource, and experienced builders budget for it the way they budget for nails. Projects die in the gap between effort and visible result; the two-weekend shell closes that gap almost immediately and converts the rest of the build into improving a house rather than imagining one. It also pairs naturally with the growth plans in our roundup of expandable tiny house floor plans — start with the shell you can finish this month, and let the house’s second act be an addition rather than a rescue.
Final Considerations
What makes diy-friendly tiny house plans work is that they respect the builder’s inexperience without condescending to it: simple geometry, standard materials, forgiving sequences, and no step that requires a skill the builder does not have yet. Every plan here obeys the same quiet contract — rectangles over sculptures, ordered trusses over rafter math, one wet wall over four, visible wiring over hopeful wiring, and a shell that stands early enough to carry the builder’s morale through the finish.
Build the simple house first. The skills it teaches — squaring a deck, disciplining a cut list, plumbing a manifold, tracing a circuit — are the foundation for every ambitious project that comes after, and they are learned fastest on a house that forgives. When you are ready to sketch that first rectangle, you can design your tiny house online with these constraints drawn in from the start: 90-degree cuts, standard lengths, one wet wall, and a roof somebody else engineered. The beautiful builds can come later. The finished build comes first.

35 Comments