

The window most homes actually have is dressed in two layers doing two different jobs: a sheer that softens the daylight and holds the room’s privacy at noon, and a heavier drape that closes the day down at night. The hardware most homes actually have is a single rod.
This guide is about marrying the two honestly — sheers behind drapes with no double rod in sight — using one pole, one track, or one slim second line, and knowing exactly what each shortcut costs before you commit to it.

1. Double Curtains Without a Double Rod at a Glance
Scope first. This guide owns one arrangement: two curtain layers at one window, hung without a double rod. Its neighbours keep their own ground: the choice between layers and slatted coverings is weighed in curtains over blinds; the wider wardrobe of window dressings is surveyed in window treatments; the shaped windows that complicate every hanging decision are in bay windows; and the tall glass that makes layered curtains worth the trouble is in clerestory windows. Here, everything is the sheer, the drape, and the single line of hardware they share.
One discipline runs through every section: a workaround is only good if it survives daily use. A layering trick that looks clever in a photograph but fights you every morning — layers that drag together, a rod that bows under two fabrics, a sheer you cannot reach — fails the only test that matters, so each option below is judged on the morning after, not the reveal.
Three honest routes exist. Both layers can ride one rod, accepting that they move together. A slim track or wire can hide behind or above the rod and carry the sheer independently. Or a narrow second rod can sit behind the first on shared brackets, which is a double rod in everything but name and price. The sections that follow take the layers’ jobs first, then the limits, then each route in turn — hardware in general terms throughout, because every window, rod and bracket differs and the maker’s own instructions govern the fitting.
| Route | What carries the sheer | The honest trade |
|---|---|---|
| One rod, both layers | The same pole as the drapes | Simplest; the layers travel together |
| Track or wire behind | A slim line hidden by the drapes | Independent movement; a fitting to add |
| Slim second rod | A narrow rod on shared brackets | Near-double-rod function, plainer hardware |
| Café rod at the glass | A small rod inside the reveal | Sheer sits close; suits smaller windows |

2. Know What Each Layer Does

Gallery-1 is the partnership in one frame: the sheer doing the day’s work — light let in, view softened, room unobserved — while the drape waits at the side, open, doing nothing but looking finished. Layering works because the two fabrics are specialists, and every hanging route below is really a way of letting each specialist work without the other’s help.
1. The sheer’s job: privacy with the light left on
A sheer is a filter, not a blindfold. Its weave passes most of the daylight while breaking up the view in, which is why a sheered window feels private at noon without the room going gloomy. Judge sheers by that balance: hold a sample against the glass on a bright day and check both directions — how much light survives, and how much of the room dissolves.
2. The drape’s job: darkness, warmth and finish
The outer layer is the closer. A lined drape drawn at night ends the window’s day — it darkens the room, softens echo, takes the chill off the glass and gives the wall its finished, dressed look. Because it works hardest when closed, its weight and lining matter more than its face; the sheer, which is seen all day, earns the prettier fabric.
3. Why layering beats either layer alone
Either layer alone makes you choose: sheers only, and evenings feel exposed and unfinished; drapes only, and every private hour costs you the daylight. Together they grade the window through the day — sheer for the bright hours, both drawn for the night — which is the whole reason the double arrangement exists, and why it is worth hanging properly on whatever hardware you have.
3. The Honest Limits of One Rod

The pin makes the compromise visible: two layers, one line of hardware, sharing every ring and every inch of travel. Nothing about that is a failure — generations of windows have dressed exactly this way — but three limits come with it, and naming them now is what separates a deliberate choice from a daily irritation.
4. The two layers move together, not independently
On a shared rod, opening the drapes carries the sheer with them, and closing the drapes buries it. If your day needs the sheer closed while the drapes stand open — the classic layered look, and the arrangement in most photographs — a single shared rod cannot hold that pose while also working the drapes; the layers can rest together or travel together, not pose apart.
5. Weight: one rod carries both fabrics
Two layers roughly double what the rod, rings and brackets hold, and a lined drape alone can be the heaviest thing on a wall. Before threading both onto an existing pole, check its span and brackets as the maker specifies — a long rod that was content with sheers may bow or work its fixings loose under a winter-weight drape added to them.
6. Fullness competes for the same space
Curtains look right gathered at roughly twice the window’s width in fabric, and two layers both want that fullness in the same few centimetres of rod. The result, if both are cut generous, is bulk: rings crowded, gathers crushed, the stack at each side twice as fat. Sharing a rod usually means trimming each layer’s fullness a little and accepting a flatter gather.
4. Route One: Both Layers on One Rod

Gallery-2 shows the simplest version of the whole idea — one honest pole, sheer and drape threaded onto it together, nothing hidden and nothing added. It suits windows that are dressed more than worked: spare rooms, formal rooms, and any window whose curtains open in the morning and close at night as a pair.
7. Sheer and drape threaded on the same pole
The mechanics are as plain as the photograph: rings or eyelets carry both panels in turn, sheer first against the glass, drape in front of it. Rod-pocket panels can share a pole directly, the sheer’s pocket and the drape’s threaded alternately if the pole’s diameter allows; where it does not, rings with clips give each layer its own hanger on the common line.
8. Order on the rod: sheer to the glass side
Whichever route you take, the order never changes: sheer nearest the glass, drape nearest the room. Reversed, the sheer would billow into the room every time the drape moved, the drape would crush against the glass and weather, and the layers’ jobs would swap badly — the day fabric trapped behind the night fabric, useless at both.
9. Headings that share a rod gracefully
Flat headings share best. Rod pockets, simple tabs and clip rings sit close to the pole and let two layers lie flat against each other; deep pleats and goblet headings eat rod space and push the front layer outward. If the drapes already carry a bulky heading, give the sheer the flattest one available — pocket or clips — so the pair stacks without a fight.
5. Route Two: A Track or Wire Behind the Rod
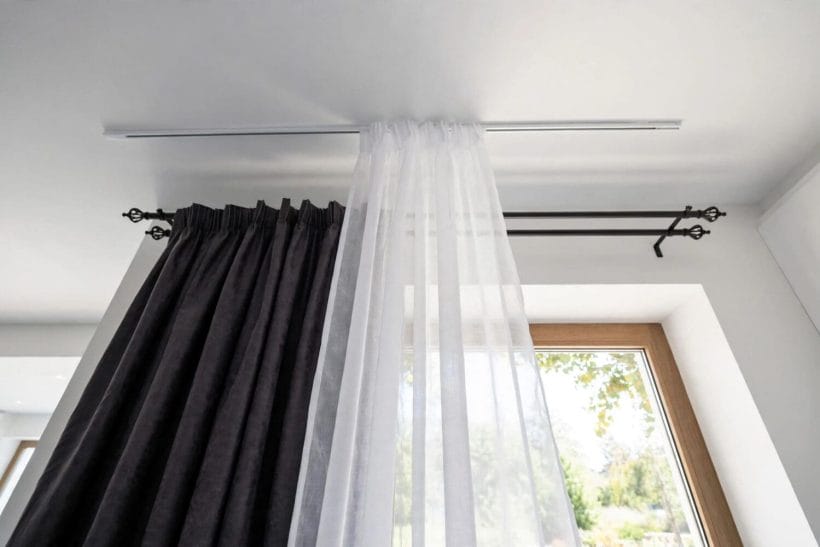
Gallery-3 is the quiet professional answer: the decorative rod performs for the room while a slim track, read as a shadow line above it, does the sheer. Because the track carries independently, the layers return to their proper arrangement — drapes posing open, sheer closed and working — with no double rod anywhere in view.
10. A slim track mounted inside the reveal
A narrow track fixed inside the window reveal, close to the glass, puts the sheer exactly where it belongs and hides entirely behind the drawn or stacked drape. Sheers are light, so a modest track suffices; its gliders run quieter than rings and the sheer draws with one hand. The reveal needs the depth to take it — the first measurement in section 10.
11. A tension wire or slim line for the sheer
The lightest version of the idea is a wire: a slim cable or tension line strung across the reveal or just behind the rod, carrying the sheer on small clips or through its pocket. It suits rented rooms and light sheers particularly well, since it asks little of the wall — but it is a line for gauze, not for fabric with any weight behind it.
12. A ceiling-mounted track in front of the window
Where the wall above the window is crowded or the reveal is shallow, the track can move to the ceiling, a few centimetres out from the glass, with the rod beneath it on the wall. The sheer then falls in front of the drape’s hardware rather than behind it — a small visual compromise that buys full independent movement for both layers.
6. Route Three: A Slim Second Rod
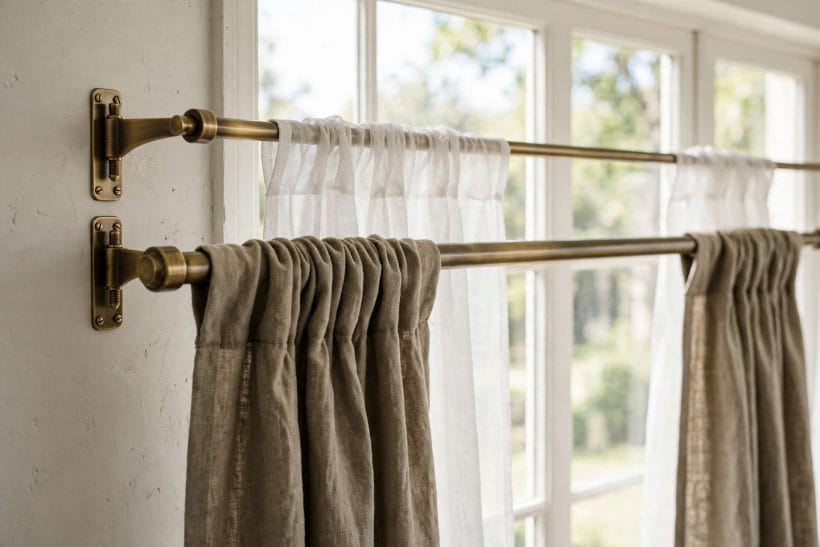
Gallery-4 shows the hardware that admits the truth: two rods, one bracket family. A narrow rear rod on extended or double brackets is the double-rod arrangement with the ornament stripped away — cheaper, plainer, and hidden behind the main rod and its drapes in almost every sightline the room offers.
13. A narrow rod behind the main rod on shared brackets
Double brackets hold the main rod proud of the wall and a slimmer one in its shadow, a few centimetres behind. The sheer rides the rear rod on small rings or its pocket; the drape keeps the front. Because both hang from the same fixings, the wall takes one set of holes — the rear rod simply borrows the front rod’s strength.
14. What the rear rod can and cannot carry
Keep the rear rod for sheers and the lightest unlined curtains. Slim rods span less and flex more than the main pole, and a heavy panel will bow them into a visible sag and drag against the front layer. Matched to a gauze, though, a rear rod is invisible in use — the sheer glides behind the drape exactly as it would on hardware costing far more.
15. Café rods at the glass
The smallest second line sits inside the reveal itself: a café rod at sill or mid height carrying a short sheer. It gives privacy where privacy is actually wanted — the lower pane, at seated eye level — while leaving the window’s head and the main rod entirely alone, and it is the traditional answer for kitchens, bathrooms and street-facing ground floors.
7. Hanging the Sheer: Headers and Hardware
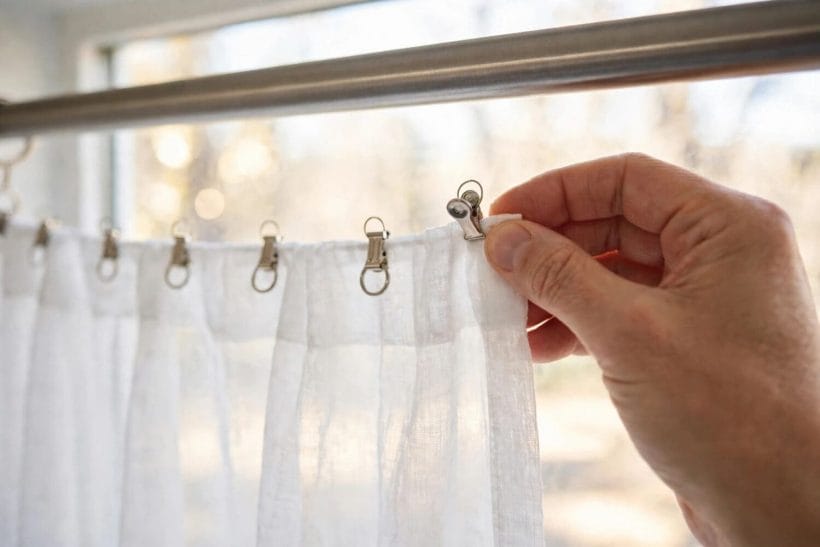
Gallery-5 catches the most useful fitting in this whole guide: the clip ring, which gives any sheer a heading in seconds. How the sheer attaches decides how it travels — whether it slides freely, bunches, or sits in flat obedient folds — so the header deserves as much thought as the route itself.
16. Rod-pocket sheers slide anywhere
The pocket is the sheer’s native heading: sewn along its top, it threads onto any rod, wire or slim line without a single extra fitting, and it gathers itself into soft even folds as it goes. Its one flaw is friction — a pocket slides reluctantly, which suits a sheer that mostly stays put and argues against one drawn twice a day.
17. Clip rings and clips for light fabrics
Clips trade the pocket’s softness for movement. A row of clip rings lets a sheer glide like a curtain twice its substance, shortens or lengthens it by where the clip bites, and removes in seconds for washing. Space the clips evenly and let them carry the fabric just below its hemmed top edge, so the sheer stands a little proud of the line — the neatest finish of any method here.
18. Hooks, pins and tape headers
Where a track does the carrying, the sheer needs its hooks: curtain tape gathered to the fullness you want, with hooks or gliders at even intervals. Tape gives the most tailored result — regular pleats that hold their spacing along the whole width — at the price of the most preparation, and it is the heading to choose when the sheer is the room’s principal day curtain.
8. Lengths, Fullness and the Stack

The pin shows the reward for getting this section right: drapes stacked clear of the glass, the sheer falling unbroken behind them, the window reading as two calm layers rather than one crowded one. Length and fullness decide whether a layered window looks composed or merely busy.
19. Sheer length: sill, apron or floor
A sheer can end at the sill, just below it at the apron, or continue to the floor behind floor-length drapes. Match the room’s formality: floor length behind long drapes looks deliberate and hides the radiator-and-pipe zone completely; sill and apron lengths suit kitchens, bathrooms and windows over furniture, where trailing gauze would only gather dust and obstruction.
20. Gathering fullness without bulk
Sheers want more fullness than drapes, not less — two to three times the window’s width is what turns gauze into that soft, even veil, because a stretched sheer shows every thread. The drape in front can then afford to be a little leaner than it would alone; between the two, the window keeps its richness while the hardware keeps its sanity.
21. Where the open drapes stack — and the sheer behind them
Drawn drapes bunch at the window’s edges in a stack that eats glass if the rod is only window-wide. Extend the rod beyond the frame on each side so the stack lands on wall, not light — and let the sheer run the full width behind, so the revealed glass is veiled edge to edge even with the drapes standing open. The bedroom schemes in bedroom ideas and the small-room arrangements in tiny house curtain ideas both lean on this one proportion.
9. Daily Use: Opening, Closing, Privacy

Gallery-6 is the arrangement at its best hour: lamps on, drapes tied back in their daytime pose, sheers closed and glowing faintly with the last of the light. A layered window is a small daily ritual, and the routes above differ mostly in how gracefully they let you perform it.
22. The morning and evening routine on shared hardware
On independent lines the ritual is two gestures: drapes open in the morning, sheers already in place; drapes closed at night, sheers undisturbed. On one shared rod it collapses into a single gesture — the pair travels together — which some households honestly prefer. Choose by your real habits, not your aspirational ones; hardware that fights the routine gets abandoned, and abandoned curtains hang closed for years.
23. Tying back drapes while sheers stay closed
Tie-backs are the layered window’s daytime signature: the drape swept into its curve, the sheer flat and working behind it. They need the layers independent — a track, wire or second rod — since a shared-rod drape cannot be tied back without dragging its sheer into the same knot. Fit the tie-back height to the drape’s own proportions; midway is the usual, forgiving answer.
24. Privacy at night: sheers alone are not enough
The honest warning this guide owes you: a sheer’s privacy reverses after dark. Backlit by lamplight, the veil that hid the room at noon displays it as silhouettes at night. Layered windows exist precisely so the drape can close over the sheer when the lamps come on — plan the arrangement so that closing is easy, and the privacy you bought by day is still yours by night.
10. Checks Before You Commit
Three measurements and one judgement stand between the idea and the hardware bag. All are stated generally — every rod, bracket and track system differs, and the maker’s own guidance for the fittings you choose governs the installation itself.
25. Measure the reveal depth for a track or second rod
Routes two and three live in the few centimetres between glass, frame and drape. Measure the reveal’s depth and the main rod’s projection before choosing: the sheer needs its own clear line, plus room for its gathers to hang without pressing the glass or rubbing the drape in front. A tape measure now is cheaper than a returned track later.
26. Check bracket strength for the combined weight
Shared brackets and shared rods carry shared weight. Weigh or honestly estimate both layers together, check the rod’s span against its maker’s guidance, and make sure the wall fixings suit the wall — plasterboard, stud and masonry each want their own fixing, and a bracket that creeps a millimetre a month is announcing a fall. Heavier drapes argue for the front rod’s strongest brackets, with the sheer’s line fixed independently where the wall allows.
27. When a true double rod is simply the right answer
Say it plainly: if both layers are heavy, both are drawn twice a day, and the window is wide, a proper double rod earns its wall space, and every workaround in this guide becomes a false economy. The workarounds shine where layers are light, movement is occasional, or the budget and the wall say one line only. Knowing which house yours is — that is the whole of the craft.
Final Considerations
Sheers behind drapes is the oldest arrangement in the window’s wardrobe, and it does not actually require the hardware it is usually sold with. One rod will carry both layers if they may travel together; a hidden track, wire or slim second rod restores their independence for a fraction of a double rod’s presence; and the sheer’s own header — pocket, clips or tape — decides how gracefully it all moves.
Work in the guide’s order: know what each layer is for, name the limits of the hardware you have, choose the simplest route that respects them, and measure before you buy a single fitting. The window that results will grade its light from noon to midnight like a room twice the price — on one honest line of hardware.




0 Comments